Motor Mounts
Replacing the motor mounts with new mounts is a potential fix to Fifth Gear Pop Out, provides crisper shifts, ensures the clutch release point stays consistent, and makes the throttle pedal feel MUCH more connected, and reduces wheel hop.
Replacing the stock mounts, with polyurethane filled ones, does increase vibration in the cockpit, most notably at idle. It’s not excessive, but is noticable.
Suprisingly it’s a very simple procedure, taking around an hour. If you do one at a time does not require dropping the engine. You only need to do the front and the rear mounts. The side mounts are not so effected by the torque of the engine so they last longer and do not benefit from being filled with urethane.
A few people have had problems with either a weak rear chassis mounting points or broken chasis bolts. So always use new mount-to-chassis bolts, and make sure you torque the bolts to specification. Also consider reinforcing the mount point.
TRD Expensive Route
Buy new TRD mounts ($250-$300) replacing the existing rubber.
DIY Filling
Fill the mounts with urethane. Either on top of the existing rubber, or by replacing the existing rubber. One tube should be enough for 4 mounts if you fill on top of the existing rubber mount. The firmness of the filler is measured with Shore – 80 is softer than 90. You can use either:
- Beige colored PL Premium Polyurethane Construction Adhesive from Home Depot for $3. This is much stiffer (rated Shore 90 to 95A) and probably more durable than window weld.
- 3M Windo Weld (part #08609) or 3M High Viscosity Urethane (part #08689). Either are $10 from Advanced Autoparts or local glass repair shops.
- 80 Shore A Urethane from McMaster-Carr for $20. Provides a slightly shofter ride fine for normal street use, and should be just as durable.
If possible clean the rubber before applying the urethane, removing dust, and loose parts. You can also take the rubber off completely and pour in urethane – get the old rubber out with a welding torch.
Urethane is very messy, and almost impossible to clean off so wear gloves, and fill the mounts over newspaper! Make sure you squeeze out any air bubbles.
Probably the most effective method is to layer the urethane in 1/4" layers. After around an hour lightly mist spray the surface with water. This will speed the drying process. Each 1/4" layer takes around 2 hours to harden. Then apply the next layer.
If you apply everything in one go, it may harden overnight, more likely over two days. A heater may speed things up. Baking seems to cause bubbles, so is not recommended.
Inserts
Use urethane mount inserts that sit on top of the existing mount inserts. You can order the urethane inserts for $55 shipped, from kirkosaurus. The inserts sit on top of the existing rubber, and can be used on mounts with cracked rubber.
Removing Motor Mounts
- Just jack up the car, using the Jack Points.
- Use something like PB Blaster if the bolts look rusted in place. Let the lubricant soak in for a few minutes.
- Loosen the large bolt (don’t remove it yet). On the front mount you’ll need to hold one side down with an open end 17mm wrench while loosening the other side. On the rear mount the bolt is welded in place.
- Loosen and remove the two smaller bolts holding the mount to the chasis. The mount to chassis bolts are 14mm. You might need to use a 3 inch extension.
- Remove the larger bolt, and off comes the mount.
- Push the new mount insert into each side of the mount, or fill with urethane.
Putting things back together is the same procedure in reverse.
- Push the mount back into the transmission bracket.
- Finger tighten the the large 17mm bolt.
- Fully tighten the two 14mm bolts.
- Fully tighten the 17mm bolt.
Excellent write-up with video at http://www.lovehorsepower.com/MR2_Docs/MotorMounts.htm.
Procedure with pictures at http://www.technicalgarage.com/archive/en/alan/mmnt.html.
Repairing a torn front engine mount
The flange where the front motor mount bolts to the chassis commonly fails on high-mileage cars. The flange cracks off due to metal fatigue and can be exaggerated by corrosion, incorrect bolt torque, and possibly stiff motor mounts or inserts. The problem presents itself as excess engine movement causing a jerk at throttle on/off movement. Repairing a broken mount can only be accomplished by welding a thick piece of sheet steel (at least .125") over the mount with at least one nut welded on for the rearmost bolt. Proper repair requires scrap metal, metalworking tools, and a capable welder. For more information visit (MR2OC).
Here is a representative example of the problem and the repair job (from MR2OC member bentheswift’s Dec. 08 repair).
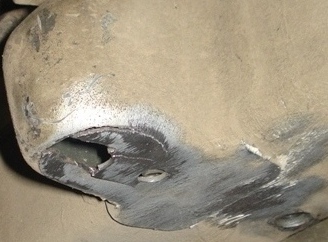
Corroded and cracked metal at the rear bolt of the front mount:
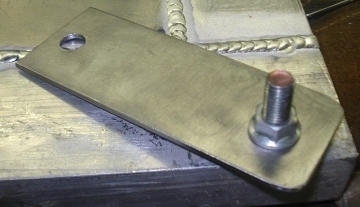
A typical repair piece. 1/8" thick steel plate with two holes and a nut TIG-welded onto it.
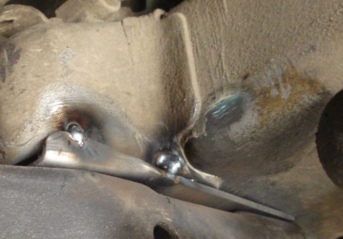
Two corners are bent back with a sheet metal bender and the piece is laid over the remains of the stock engine mount:
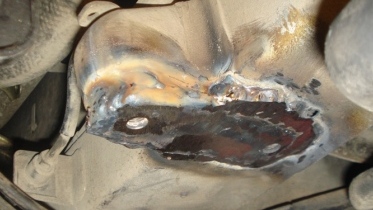
The final piece is MIG-welded onto the chassis. Make sure the weld is as strong as possible. Grind flat after welding.
This is only one way of doing it. Others have used much larger pieces of sheet metal or built an entirely new mount.